Configuring Bluebeam integration
With the Bluebeam integration, acquire the admin level permissions on the submittals with the ability to create a Bluebeam session directly from the SmartGov submittals tab.
Configuring Bluebeam integration
SmartGov setup
Prior to using electronic plan review in SmartGov, please reach out to our Client Services team to make sure your account is configured correctly. Once specific settings are enabled by our Client Services team, you will need to update the Security functions for the applicable roles. *Note: These will most likely be Permit Technicians and/or Permit Administrators.
There are two types of secure functions that need to be assigned to your users working with Bluebeam. There is Bluebeam.Administrator and Submittal.DigitalPlan.
Your Permit Technicians or any other users who are in charge of checking-in and checking-out submittals, undoing the checkout, and adding files to an existing session through SmartGov, will need to have the Submittal.DigitalPlan secure function. This can be applied to their account either through an assigned Security Group or a specific secure function assigned directly to the user.
You will want to limit the number of SmartGov users who have the secure function Bluebeam.Administrator to only those individuals who are experienced Bluebeam administrators. Individuals with this SmartGov secure function will be given FULL administrative access to the project in Bluebeam. These users will be identified as an Administrator on the project created in Bluebeam and will have access to configuration settings and the projects within the Bluebeam application. This secure function can be applied to their account either through an assigned Security Group or a specific secure function assigned directly to the user.
- Click Administration in the navigation menu, then click Department/User Setup. You can edit the Security Group or individual user to apply the appropriate secure function.
Edit the security group
- Select Security Groups.
- Choose the appropriate role from the list of security groups.
- Depending on the Security Group selected, you may need one of the two secure functions: Bluebeam.Administrator or Submittal.DigitalPlan.
- Click Add.
- Begin typing or click the magnifying glass icon (
 ) and select Bluebeam.Administrator or Submittal.DigitalPlan.
 - Check the permission boxes that should apply to this function. (*Note: You can find a description of each permission on the Security Group page.
- Click Save.
Edit an individual user
- Select Users.
- Choose the appropriate user from the list.
- Click on the Security Groups tab.
- Click on Secure Functions at the bottom of the page.
- Click Add in the window that appears.
- Begin typing or click the magnifying glass icon () and select Bluebeam.Administrator or Submittal.DigitalPlan.
- Click Save.
- Click Save to save the changes for this user.
Bluebeam setup
For users new to Bluebeam Revu, the instructions below assume the user is viewing the Revu profile. An experienced user does not need to use this profile as long as they are able to navigate to the Tool Chest and update the subjects.
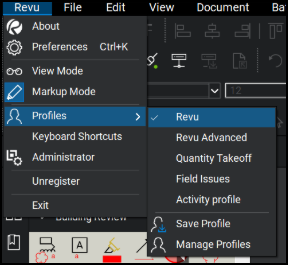
- Click Profiles, and select Revu.
- To get to the Revu profile, click Revu in the top left corner of the screen.
- Set up your Tool Chest so each 'Subject' corresponds with a Workflow Step. For example, if your permit type has a workflow step called 'Building' for plan reviewers in the Building department, your Bluebeam subject should also be called 'Building'.
- Click the brief case icon to open the Tool Chest.
- Click the Tool Chest drop-down and select Manage Tool Sets.
- Select the appropriate tool set and click Modify.
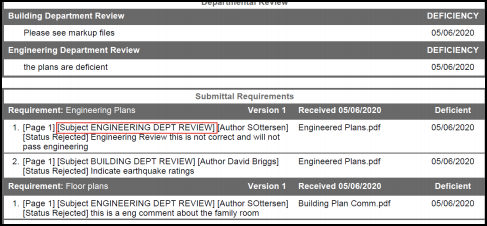
- In the window that displays, you will see a Subjects column. The names of these subjects must match the workflow steps listed on the permit in SmartGov. This will allow the SmartGov deficiency report to reflect the appropriate workflow step in the comment.
Permit type configuration
In order to check out a permit submittal for electronic plan review, you must confirm that the permit type is set up correctly.
- Click Administration from the navigation menu, then click Permitting Setup.
- Select Permit Types.
- Click the permit type from the list.
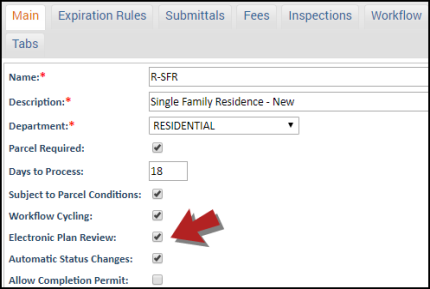
Main tab
- Ensure you are on the Main tab of the permit type and check the box beside Electronic Plan Review.
- Click Save.
Submittals tab
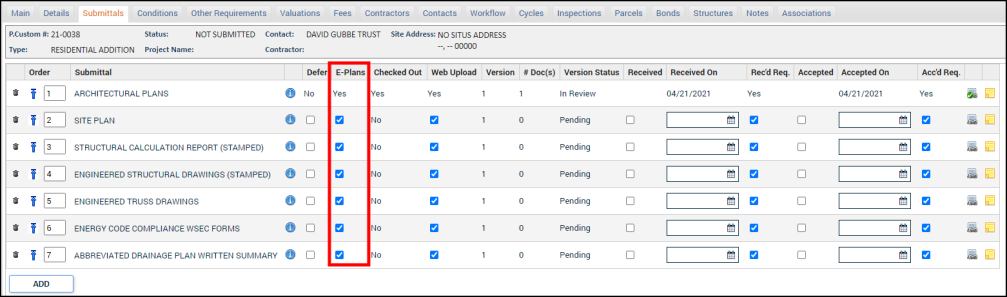
- Once a submittal has been added to a permit type, associate the submittal with a workflow step.
- Check the box in the E-Plans column to allow the submittal to be digitally reviewed using an electronic plan review application.
- Click Save.
Workflow tab
- Ensure that the workflow step names that involve submittals needing digital markup correspond to the 'Subjects' in Bluebeam. This ensures that deficiency comments for the workflow step are correctly reflected in the deficiency report that will be generated.
- Assign each workflow step to a group, where applicable. The Permit Technician can later assign the steps to a specific individual as part of the Permit Intake workflow step.
We recommend utilizing the different Display Worklists on the Workflow tab to streamline digital plan review and permit processing.
Configure the Administrative worklist to include four workflow steps: Permit Intake, Assign Reviewers, Create Bluebeam Session, and Permit Ready to Issue.
- Click the link icon (
 ) for Assign Reviewers and add Permit Intake as a Base Step and Create Bluebeam Session as a Dependent Step.
 - Click Save.
- Click the link icon () for Permit Ready to Issue and add any necessary steps from the Review Worklist that must be complete prior to issuing the permit as a Base Step.
- Click Save.

